|
Choosing the ideal general contractor is crucial to the success of your construction project. Here are some steps and tips to help you make an informed decision: 1. Define Your Project Needs:
4. Check References:
11. Insurance Coverage:
By following these steps, you can increase the likelihood of hiring a reliable and competent general contractor for your project.
0 Comments
Who would have thought the New Construction Permitting process would have been so strenuous? It was the path of the unknown that delayed this part of our project. Most people we know had contractors take care of this, but we did everything ourselves from start to finish when it came to permitting. We have documented the process and know what comes next so there would be no delays in our next build. Permitting, in the context of new construction, refers to the process of obtaining official approval from the relevant government authorities to proceed with a construction project. This approval typically comes in the form of a permit, which is a document that authorizes the construction or alteration of a structure and ensures that it complies with local building codes, zoning regulations, and other applicable laws. The permitting process is a crucial step in the construction of a new building or structure, and it helps to ensure that the construction meets safety, health, and environmental standards. The specific requirements for permits can vary widely depending on the location and the type of construction, but generally, it involves submitting detailed plans and documents to the appropriate government agency for review. Here are some key components of the permitting process:
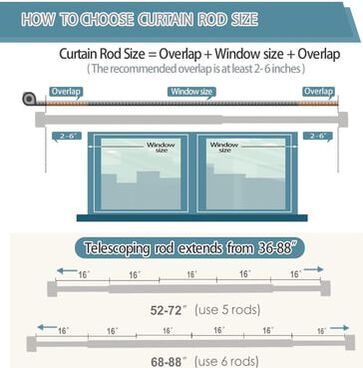
1. Building Codes and Zoning Regulations: The construction project must comply with local building codes, which set forth the standards for construction, including structural, electrical, plumbing, and other elements. Zoning regulations dictate how land can be used and may impose restrictions on the type, size, and height of structures. 2. Plan Submission: The property owner or contractor typically needs to submit detailed construction plans, specifications, and other relevant documents to the local building department. These plans provide a comprehensive overview of the project, including design details, materials to be used, and other relevant information. 3. Review and Approval: Government officials, such as building inspectors and planning departments, review the submitted plans to ensure they comply with all applicable regulations. This process may involve multiple rounds of review and may require revisions to the plans before approval is granted. 4. Permit Issuance: Once the plans are approved, the building department issues the necessary permits. These permits grant permission to start construction and may include various stages, such as foundation, framing, electrical, and plumbing permits, etc. 5. Inspections: During and after construction, inspectors may visit the site to ensure that the work is being done according to the approved plans and in compliance with building codes. Inspections may be required at different stages of construction, such as before covering up foundations or after electrical or plumbing work. 6. Completion and Certificate of Occupancy: After the construction is complete and has passed all required inspections, a final inspection may be conducted. If everything is in order, a Certificate of Occupancy or equivalent document is issued, indicating that the building is safe and suitable for occupancy. It's essential to note that the specific permitting process can vary by jurisdiction, so it's crucial to work closely with the local building department to understand and comply with the specific requirements in your area. Failure to obtain the necessary permits can result in fines, delays, or even the stoppage of construction. Curtains are more than just functional window coverings; they are an integral part of your home's decor. When hung with care and attention to detail, curtains can transform a room, adding style, warmth, and personality. To help you achieve a designer look in your space, we've put together a comprehensive guide on how to hang curtains like a pro. 1. Choose the Right Fabric: Before diving into the hanging process, start by selecting the right fabric for your curtains. Different fabrics drape and hang in various ways, impacting the overall look of the window treatment. Linen and silk exude luxury, while cotton and polyester provide a more casual feel. Consider the aesthetic of your room and the amount of natural light you want to filter in when choosing your curtain fabric. 2. Measure Twice, Hang Once: Precision is key when it comes to curtain measurements. Measure the height and width of your windows, and add a few extra inches to both dimensions to ensure your curtains look full and don't leave any gaps. If you prefer a more luxurious look, mount the curtain rod several inches above the window frame and let the curtains pool on the floor for a dramatic effect. 3. Select a Statement Rod: Beyond functionality, your curtain rod is a design statement. Choose a material, finish, and style that complements your curtains and overall decor, accentuating the elegance of your window treatment. 4. Mind the Length: Achieving the perfect curtain length is crucial for a polished look. Curtains that are too short can make the room feel incomplete, while those that are too long may look messy. Ideally, curtains should just kiss the floor or create a subtle break. For a more modern touch, you can let them hover slightly above the floor. 5. Embrace Opulent Fullness: Create a rich, opulent look by ensuring there's ample fabric. Generally, aim for at least twice the width of the window for a standard fullness, but you can go up to three times for a more sumptuous appearance. 6. Consider the Hanging Style: The way you hang your curtains can significantly impact the overall aesthetic. Traditional styles like the pinch pleat offer a timeless and tailored appearance, while grommet-top curtains exude a more contemporary feel. Experiment with different hanging styles to find the one that best suits your design preferences. 7. Mind the Fold: When opening and closing your curtains, they should fold neatly and create an attractive display. Experiment with the folds to find a style that suits your curtains and enhances the overall design. Make sure the folds are even on both sides for a balanced look. Ceiling Height breakdown…
Certainly! When hanging curtains, the height at which you mount the curtain rod can greatly influence the perceived height of the room. Here's a detailed measurement guide for various ceiling heights: 1. 8-Foot Ceiling: - Curtain Rod Height: Mount the curtain rod about 4 to 6 inches above the window frame. This creates an illusion of height and allows ample space for the curtains to hang without blocking too much light. - Curtain Length: Opt for curtains that reach just below the window sill or touch the floor for a classic and tidy look. 2. 9-Foot Ceiling: - Curtain Rod Height: For a 9-foot ceiling, mount the curtain rod slightly higher, about 6 to 12 inches above the window frame. This draws the eye upward, making the room feel more spacious. - Curtain Length: Choose curtains that extend to the floor. Allowing them to pool slightly on the floor can add a touch of luxury, especially if the fabric is flowing. 3. 9.5-Foot Ceiling: - Curtain Rod Height: With a 9.5-foot ceiling, consider mounting the curtain rod 12 to 18 inches above the window frame. This enhances the vertical visual space and adds a sense of grandeur. - Curtain Length: Opt for curtains that either kiss the floor or have a slight break. Pooled curtains can still be elegant but ensure the length doesn't overpower the room. 4. 10-Foot Ceiling: - Curtain Rod Height: For a 10-foot ceiling, mount the curtain rod 18 inches or more above the window frame. This emphasizes the height of the room and creates a more dramatic, luxurious effect. - Curtain Length: Choose full-length curtains that gracefully pool on the floor. This style complements the heightened elegance of the space and adds a touch of sophistication. Additional Tips: - Width of Curtains: Ensure the curtain rod extends beyond the window frame to allow the curtains to fully cover the window when drawn. - Fullness: Aim for at least double the width of the window for a standard fullness. Adjust based on personal preference and the desired level of opulence. - Experiment: These are general guidelines; feel free to experiment based on your aesthetic preferences and the specific characteristics of your room. By tailoring your curtain measurements to the ceiling height, you can create a visually appealing and well-proportioned window treatment that enhances the overall design of your space. Conclusion: By embracing the finer details and following these tips, you can master the art of hanging curtains with the finesse of a seasoned designer. From selecting the perfect fabric to perfecting the folds, each step contributes to creating a cohesive and visually captivating window treatment. Take the time to experiment and find the perfect balance, turning your curtains into a stunning focal point that breathes life into your living space. Choosing the Right Architect for Your New Home Project: Key Considerations and Essential Questions
Embarking on a construction or renovation project is an exciting endeavor, and one of the most crucial decisions you'll make is choosing the right architect. Architects are the creative visionaries who bring your dreams to life, transforming your ideas into tangible structures. To ensure the success of your project, it's vital to find an architect who aligns with your goals, understands your aesthetic preferences, and possesses the necessary expertise. In this blog, we'll explore the key considerations and provide you with essential questions to ask when selecting the perfect architect for your project. 1. Determine Your Project Requirements: Before you begin your search for an architect, it's essential to have a clear understanding of your project requirements. a) Do you have a specific architectural style or design preference in mind? b) What is your project budget and timeline? c) Are there any unique challenges or requirements associated with your project? Having a clear vision and articulating your project requirements will help you find an architect who can deliver the results you desire. 2. Evaluate the Architect's Experience and Expertise: The experience and expertise of an architect are critical factors in choosing the right professional for your project. a) How many years of experience does the architect have? b) Has the architect worked on similar projects in the past? c) Can the architect provide references from previous clients? d) Is the architect familiar with the local building codes and regulations? e) Will the architect stand behind their designs and make changes when at fault? f) Do they have insurance for any issues that happen down the road? By assessing their experience and expertise, you can gauge their ability to handle your project effectively. 3. Review Their Portfolio: An architect's portfolio is a window into their style, creativity, and versatility. Take the time to review their previous work and assess whether their design aesthetic aligns with your vision. a) Can the architect provide examples of projects similar to yours? b) Does their portfolio showcase diversity in architectural styles and scales? c) Have they won any awards or accolades for their work? By evaluating their portfolio, you can gain insight into their design sensibilities and determine if they can bring your vision to life. 4. Understand the Design Process: A successful collaboration with an architect requires a clear understanding of their design process and how they involve clients in decision-making. a) How do you typically engage clients in the design process? b) What steps are involved from the initial concept to the final construction phase? c) How do you handle revisions and changes during the design process? d) Will I have access to 3D renderings or other visualizations to better understand the design? e) Will electrical, plumbing, engineering, additional areas that could account for rooms or storage, functional spaces and areas, HVAC, interior doors, etc. Understanding the architect's design process will help you ensure that your expectations are aligned and that you're comfortable with their approach. 5. Communication and Compatibility: Effective communication and a positive working relationship are essential when collaborating with an architect. Ask the following questions to gauge their communication style and compatibility: a) How do you prefer to communicate with clients? (In-person meetings, phone calls, emails, etc.) b) What is your typical response time for client inquiries? Requests vs Design alterations? c) Can you provide an example of a project where you faced challenges in communication and how you resolved them? Choosing an architect with whom you can communicate effectively and who understands your needs is vital for a successful collaboration. Cannot stress enough that choosing the right architect for your project is a decision that should not be taken lightly. By asking the essential questions outlined above, you can gain a comprehensive understanding of the architect's expertise, style, and working process. Remember to trust your instincts and select an architect who not only possesses the necessary skills but also shares your creative vision and values. A harmonious partnership with the right architect will not only ensure a successful outcome for your project but also make the entire process a rewarding and enjoyable experience. So, take the time to conduct thorough research, ask pertinent questions, and trust your instincts as you choose the architect who will turn your dream into a reality. Canyon Lake is a community built into the hills and mountains surrounding a man-made lake. There are properties with varying views and property lines. Question is, should you choose to build on a flat lot or on a cliff? For us, we were moving into a canyon community that cliff homes are a norm. I felt like every flat lot we looked at, there was always a house above looking down onto our property and into our home. Privacy was a real issue. When I saw the lot on Inspiration Point, it was steep and the Realtor I was with didn’t seem to bat an eye as that’s how a majority of the homes were built in the community. I was also a big fan that we were going to own a home on Inspiration Point, what a name huh? Couldn’t be any more of a better fit for us after all the ups and downs of the house hunting we have done. We had our general contractor come over for a visit to talk through budgets and so forth. He was adamant that we needed to buy a flat lot as these cliff homes are difficult and costly to build. The privacy factor and the view outweighed the risk itself so we went with our gut and purchased the cliff lot. We told our general contractor that we are all up for the challenge. Three years later and our general contractor still complains. I am definitely still happy with our decision. We will see how it all turns out.
Our search for a new home was a wild ride. There are so many questions you need to ask yourself to start the process: Where to look? Old vs. New? Fixer Upper vs Breaking Ground Construction? You think you know what you want then realtors start sending all of the options and you are inundated. My husband, Jeff, and I decided we wanted to look at new construction and also had several realtors we worked with over the years help with the process. Nothing ever seemed to fit our style, vibe, and the idea of what we wanted for the future. There were properties from Irvine up to the South Bay. If anything it would give me ideas on the trends in real estate enticing me to want to get back into this field, as I had previously worked in it. We had at least seven realtors that sent us properties on the daily. We started to look in Texas, Florida, and Arizona as we were thinking that we needed to move outside of California to get what we wanted. I have lived in Texas and Florida at one point of my life so I was leaving it up to Jeff to choose the order of states that he desired to move to. It changed several times. I continued to look at different options within my company to relocate, but when something popped up, I could not pull the trigger to make the move. I had already lived in both Texas and Florida and with Arizona I felt landlocked. I could not shake my gut feeling that we were not meant to leave yet. There was more for us to do. Finally, after choosing the different areas around Southern California that fit our needs, we chose the inland area of Temecula. It is Southern California's wine county and still a very nice area to live in.
|


